
TL;DR: When you enable TLS on the BMC SMTP Settings page, all three certificate fields become mandatory. Supply the DigiCert root CA (a single, CA-only PEM) for the Cacert field, and a self-signed certificate/key pair for the Server CRT and Server Key fields. Microsoft 365 / Office 365 SMTP authenticates with your mailbox username and password, not a client certificate. Upload the certificates before filling in the SMTP text fields, because each upload reloads the page and clears unsaved fields. Use the PowerShell block at the end of this article (copy and paste) to produce the three files — it uses only built-in Windows PowerShell, with nothing to install.
Recommended action:
The numbers below match the callouts in the screenshot. Upload the certificates (steps 3–5) before filling in the boxed fields (step 6): each certificate upload reloads the page and clears any unsaved fields, so anything typed first gets wiped.
Before you start, create the .pem, .crt and .key files: on any Windows machine, open Windows PowerShell, copy the PowerShell block at the end of this article, paste it into the window, and press Enter. No installation is required — it uses only built-in Windows PowerShell (5.1 or later). It creates a bmc-smtp-certs folder in your current directory containing cacert.pem, server.crt, and server.key.
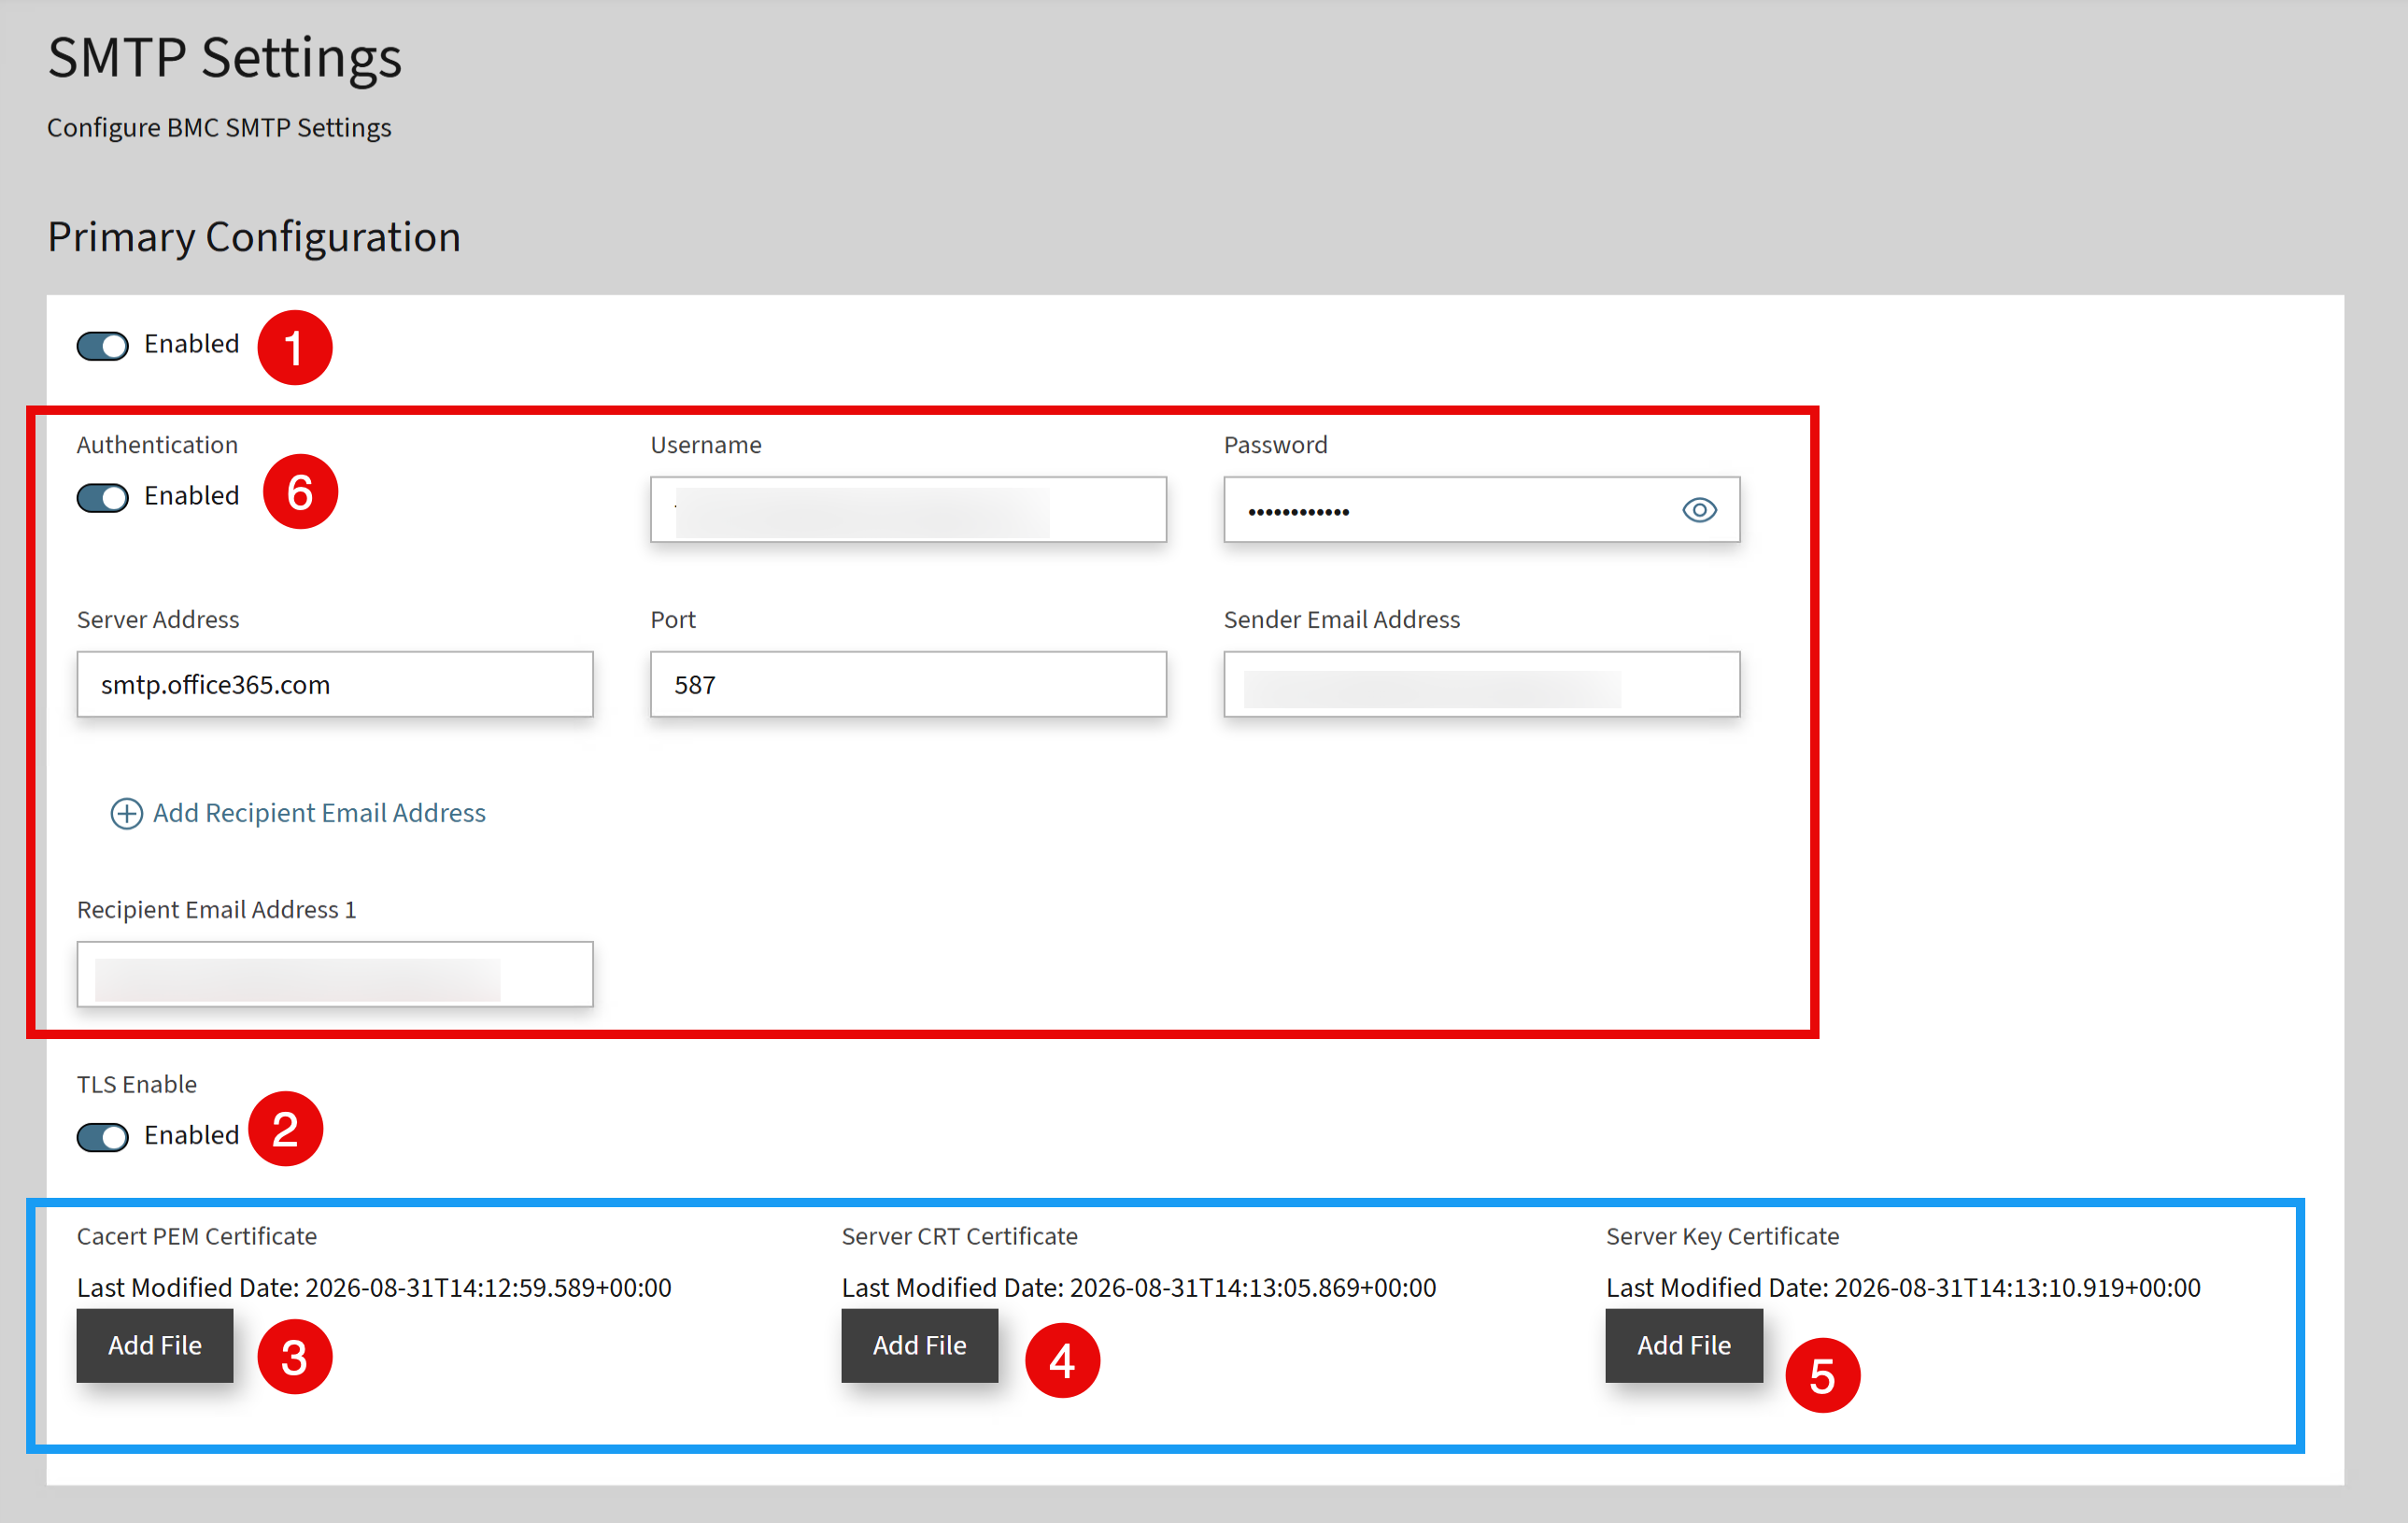
On the BMC SMTP Settings page shown above, complete these steps in order:
Turn on Enabled.
Turn on TLS Enable. This reveals the three certificate fields.
Cacert PEM Certificate → Add File →
cacert.pem.Server CRT Certificate → Add File →
server.crt.Server Key Certificate → Add File →
server.key. Upload steps 3–5 one at a time, letting each show a Last Modified Date before starting the next. (MiTAC's guide suggests allowing 10–20 seconds for the mail service to restart between uploads; in testing, uploading them one after another worked without an explicit pause. If an upload ever errors, wait a few seconds and retry it.)Now fill in the remaining fields (the boxed section): Authentication enabled with a valid O365 mailbox Username and Password, Server Address
smtp.office365.com, Port587, Sender Email Address, and at least one Recipient Email Address.Click Save Settings, then use Send Test Alert to confirm mail is delivered to your recipient address.
Why:
With TLS enabled, the BMC firmware requires all three certificate files, treating the connection as though the BMC must present its own certificate. Office 365 submission (port 587 with STARTTLS) authenticates by SMTP AUTH — username and password — so no client certificate is exchanged. The self-signed pair simply satisfies the firmware's mandatory fields. The Cacert only needs the root certificate as a trust anchor, because the O365 server presents its own intermediate certificate during the TLS handshake. Each certificate upload restarts the BMC mail service and reloads the page, which is why unsaved text fields are cleared and why the certificates should be uploaded first.
Going forward:
Two things commonly cause an "error adding certificate" if you prepare the files by hand instead of using the script below: uploading the full server chain to the Cacert field (its first certificate is the outlook.com leaf, which is not a CA and is rejected — use the root only), and Windows CRLF line endings in the PEM files (use LF). The script avoids both automatically. Microsoft occasionally rotates the certificate authorities behind its SMTP endpoints; if test alerts stop being delivered after a change on Microsoft's side, re-run the block to refresh cacert.pem. The self-signed Server CRT/Key can remain in place (10-year validity) unless your security policy requires periodic rotation.
Optional details:
The block uses only native components: Invoke-WebRequest downloads the DigiCert Global Root G2 root for the Cacert field, and New-SelfSignedCertificate generates the Server CRT/Key pair, exporting an unencrypted PKCS#8 PEM private key via native ASN.1 encoding (validated byte-for-byte against OpenSSL). If you prefer to prepare the Cacert file by hand, download the root directly in a browser from https://cacerts.digicert.com/DigiCertGlobalRootG2.crt.pem and use it as cacert.pem. Nothing in this procedure requires OpenSSL or any other installed tool.
PowerShell (copy and paste):
# Generates the three PEM files for the BMC SMTP + Office 365 (TLS) setup.
# Built-in Windows PowerShell 5.1+ only - no OpenSSL, nothing to install.
# Paste this whole block into a PowerShell window and press Enter.
# Output: a 'bmc-smtp-certs' folder in your current directory.

$OutDir = ".\bmc-smtp-certs"
$ErrorActionPreference = "Stop"
New-Item -ItemType Directory -Force -Path $OutDir | Out-Null
# Resolve to an ABSOLUTE path. [System.IO.File]::WriteAllText (used below) resolves
# relative paths against [Environment]::CurrentDirectory, which is NOT the same as
# the PowerShell prompt location ($PWD) - so without this the PEM files would be
# written to the wrong folder even though New-Item created the right one.
$OutDir = (Resolve-Path -LiteralPath $OutDir).Path
$cacertFile = Join-Path $OutDir "cacert.pem"
$crtFile    = Join-Path $OutDir "server.crt"
$keyFile    = Join-Path $OutDir "server.key"

# ---------- minimal ASN.1 DER encoder (List[byte] based) ----------
function New-DerLen([int]$n) {
    $l = New-Object 'System.Collections.Generic.List[byte]'
    if ($n -lt 0x80) { $l.Add([byte]$n) }
    else {
        $tmp = New-Object 'System.Collections.Generic.List[byte]'
        $v = $n; while ($v -gt 0) { $tmp.Insert(0, [byte]($v -band 0xFF)); $v = $v -shr 8 }
        $l.Add([byte](0x80 -bor $tmp.Count)); $l.AddRange($tmp)
    }
    return ,$l.ToArray()
}
function New-DerInt([byte[]]$data) {
    $i = 0; while ($i -lt $data.Length - 1 -and $data[$i] -eq 0) { $i++ }
    $data = [byte[]]($data[$i..($data.Length - 1)])
    $l = New-Object 'System.Collections.Generic.List[byte]'
    $l.Add([byte]0x02)
    if ($data[0] -band 0x80) {
        $l.AddRange((New-DerLen ($data.Length + 1))); $l.Add([byte]0); $l.AddRange($data)
    } else {
        $l.AddRange((New-DerLen $data.Length)); $l.AddRange($data)
    }
    return ,$l.ToArray()
}
function New-DerSeq([byte[]]$data) {
    $l = New-Object 'System.Collections.Generic.List[byte]'
    $l.Add([byte]0x30); $l.AddRange((New-DerLen $data.Length)); $l.AddRange($data)
    return ,$l.ToArray()
}
function New-DerOctet([byte[]]$data) {
    $l = New-Object 'System.Collections.Generic.List[byte]'
    $l.Add([byte]0x04); $l.AddRange((New-DerLen $data.Length)); $l.AddRange($data)
    return ,$l.ToArray()
}
function ConvertTo-Pem([byte[]]$der, [string]$header) {
    $b64 = [Convert]::ToBase64String($der)
    $sb  = New-Object System.Text.StringBuilder
    [void]$sb.Append("-----BEGIN $header-----`n")
    for ($i = 0; $i -lt $b64.Length; $i += 64) {
        $len = [Math]::Min(64, $b64.Length - $i)
        [void]$sb.Append($b64.Substring($i, $len)).Append("`n")
    }
    [void]$sb.Append("-----END $header-----`n")
    return $sb.ToString()
}
function Save-Text([string]$path, [string]$text) {
    # Force LF line endings; some BMC parsers reject CRLF.
    $text = $text -replace "`r`n", "`n"
    [System.IO.File]::WriteAllText($path, $text, (New-Object System.Text.ASCIIEncoding))
}

# ---------- Step 1: obtain the correct root CA ----------
# The Cacert field needs the ROOT CA that signs the O365 server certificate.
# For current Microsoft 365 SMTP this is DigiCert Global Root G2. Downloading it
# needs no tooling. If Microsoft ever rotates CAs, replace the URL below with the
# new root (identify it by opening https://outlook.com in a browser and viewing
# the certification path, top-most entry).
$RootUrl = "https://cacerts.digicert.com/DigiCertGlobalRootG2.crt.pem"

Write-Host "[1/3] Downloading root CA for the Cacert field ..."
try {
    # Windows PowerShell 5.1 (.NET Framework) defaults to TLS 1.0/1.1; DigiCert
    # requires TLS 1.2. Force it so the download works on 5.1 as well as 7.x.
    [Net.ServicePointManager]::SecurityProtocol = `
        [Net.ServicePointManager]::SecurityProtocol -bor [Net.SecurityProtocolType]::Tls12
    $tmp = Join-Path $OutDir "_root.tmp"
    Invoke-WebRequest -Uri $RootUrl -OutFile $tmp -UseBasicParsing
    $rootPem = Get-Content $tmp -Raw
    Remove-Item $tmp -Force
} catch {
    throw "Could not download the root CA from $RootUrl. Check network/proxy access, or download it in a browser and save it as $cacertFile. $_"
}
Save-Text $cacertFile $rootPem
Write-Host "      Wrote $cacertFile"

# ---------- Step 2: self-signed pair for Server CRT / Server Key ----------
Write-Host "[2/3] Generating self-signed Server CRT / Server Key pair ..."
# Legacy CSP provider => $cert.PrivateKey is an RSACryptoServiceProvider whose
# ExportParameters($true) works reliably on Windows PowerShell 5.1.
$cert = New-SelfSignedCertificate -Subject "CN=bmc-smtp" `
    -KeyAlgorithm RSA -KeyLength 2048 `
    -KeyExportPolicy Exportable -KeySpec KeyExchange `
    -Provider "Microsoft Enhanced RSA and AES Cryptographic Provider" `
    -NotAfter (Get-Date).AddYears(10) `
    -CertStoreLocation "Cert:\CurrentUser\My"

try {
    $rsa = $cert.PrivateKey
    $prm = $rsa.ExportParameters($true)

    # PKCS#1 RSAPrivateKey
    $body = New-Object 'System.Collections.Generic.List[byte]'
    $body.AddRange((New-DerInt ([byte[]](0))))
    $body.AddRange((New-DerInt $prm.Modulus))
    $body.AddRange((New-DerInt $prm.Exponent))
    $body.AddRange((New-DerInt $prm.D))
    $body.AddRange((New-DerInt $prm.P))
    $body.AddRange((New-DerInt $prm.Q))
    $body.AddRange((New-DerInt $prm.DP))
    $body.AddRange((New-DerInt $prm.DQ))
    $body.AddRange((New-DerInt $prm.InverseQ))
    $pkcs1 = New-DerSeq ($body.ToArray())

    # Wrap PKCS#1 into unencrypted PKCS#8 PrivateKeyInfo
    $rsaOid = [byte[]](0x06,0x09,0x2a,0x86,0x48,0x86,0xf7,0x0d,0x01,0x01,0x01)
    $nullb  = [byte[]](0x05,0x00)
    $alg    = New-Object 'System.Collections.Generic.List[byte]'
    $alg.AddRange($rsaOid); $alg.AddRange($nullb)
    $algId  = New-DerSeq ($alg.ToArray())
    $p8     = New-Object 'System.Collections.Generic.List[byte]'
    $p8.AddRange((New-DerInt ([byte[]](0))))
    $p8.AddRange($algId)
    $p8.AddRange((New-DerOctet $pkcs1))
    $pkcs8  = New-DerSeq ($p8.ToArray())

    Save-Text $crtFile (ConvertTo-Pem $cert.RawData "CERTIFICATE")
    Save-Text $keyFile (ConvertTo-Pem $pkcs8       "PRIVATE KEY")
    Write-Host "      Wrote $crtFile and $keyFile"
} finally {
    # Remove the temporary cert from the user store.
    Remove-Item ("Cert:\CurrentUser\My\" + $cert.Thumbprint) -Force -ErrorAction SilentlyContinue
}

# ---------- Step 3: guidance ----------
Write-Host "[3/3] Done. On the BMC SMTP Settings page (TLS Enable = on) upload:"
Write-Host "      Cacert PEM Certificate  -> $cacertFile"
Write-Host "      Server CRT Certificate  -> $crtFile"
Write-Host "      Server Key Certificate  -> $keyFile"
Write-Host ""
Write-Host "      Upload the three files one at a time; if an upload errors, wait a few"
Write-Host "      seconds and retry. Then click Save Settings and use Send Test Alert."